By Michael Bielaczyc
These solo roleplaying rules are based on and developed from Oracle RPG. For more on their system, visit https://oracle-rpg.com/
For the complete Road West Campaign, visit DarkReturn.com/roadwest.
What is Solo Play?
Solo playing role-playing can be many things to the player. You could be very interested in seeing an elaborate story play out aided by the randomness of the dice. You could enjoy combat and the tactical nature of controlling both the bad guys and your hero. As the player and the StoryGuide, you get to craft your story how you like to play.
With the Road West, there is a list of tasks that you do, which lead to random outcomes for you to roleplay within. Afterwards, just like our Living Campaign, you can turn in an Expedition Report to build the lore of the campaign.
Road West
Solo Play does not advance the roads in the Living Campaign, but it does allow for skill gain and a Gold Piece bounty from the Wanderers for each Accepted Expedition report filed on Discord. Accepted Expedition Reports become canon for the hexes explored, meaning even though you are not pathfinding the main road west, you are adding to the story of the campaign.
The Road West solo play uses the normal Road West Rules with a few tweaks.
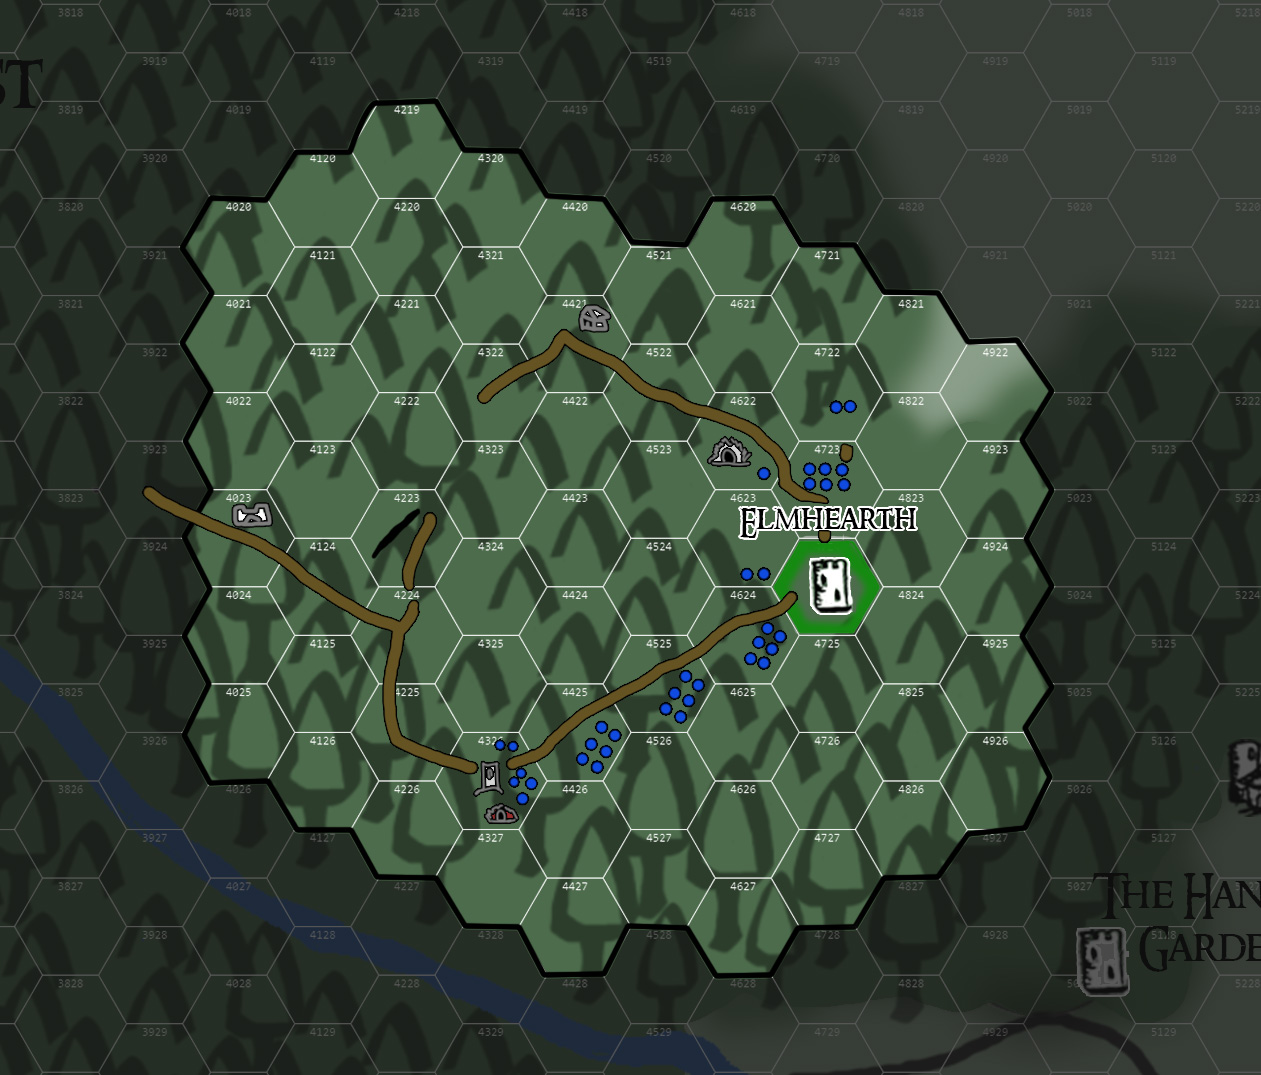
In Solo Play you are only able to explore the unexplored hexes around Elmhearth. As the Road West Living Campaign expands, the Solo Play may expand further West as well. Just like in the Living Campaign, you can travel along any road unhindered.
Heroes and Allies
You can make a new hero using the SagaBorn d100 system, or you can use your current Road West Character. Traveling alone can be very dangerous, so we recommend bringing a couple of ally NPC’s with you. The easiest way is to just grab a couple of
Start of Session:
- Downtime only includes crafting, and the leveling of the crafting skill through use.
- Purchase Goods. (All basic equipment under 75 gp is available at the Storehouse)
Per Day
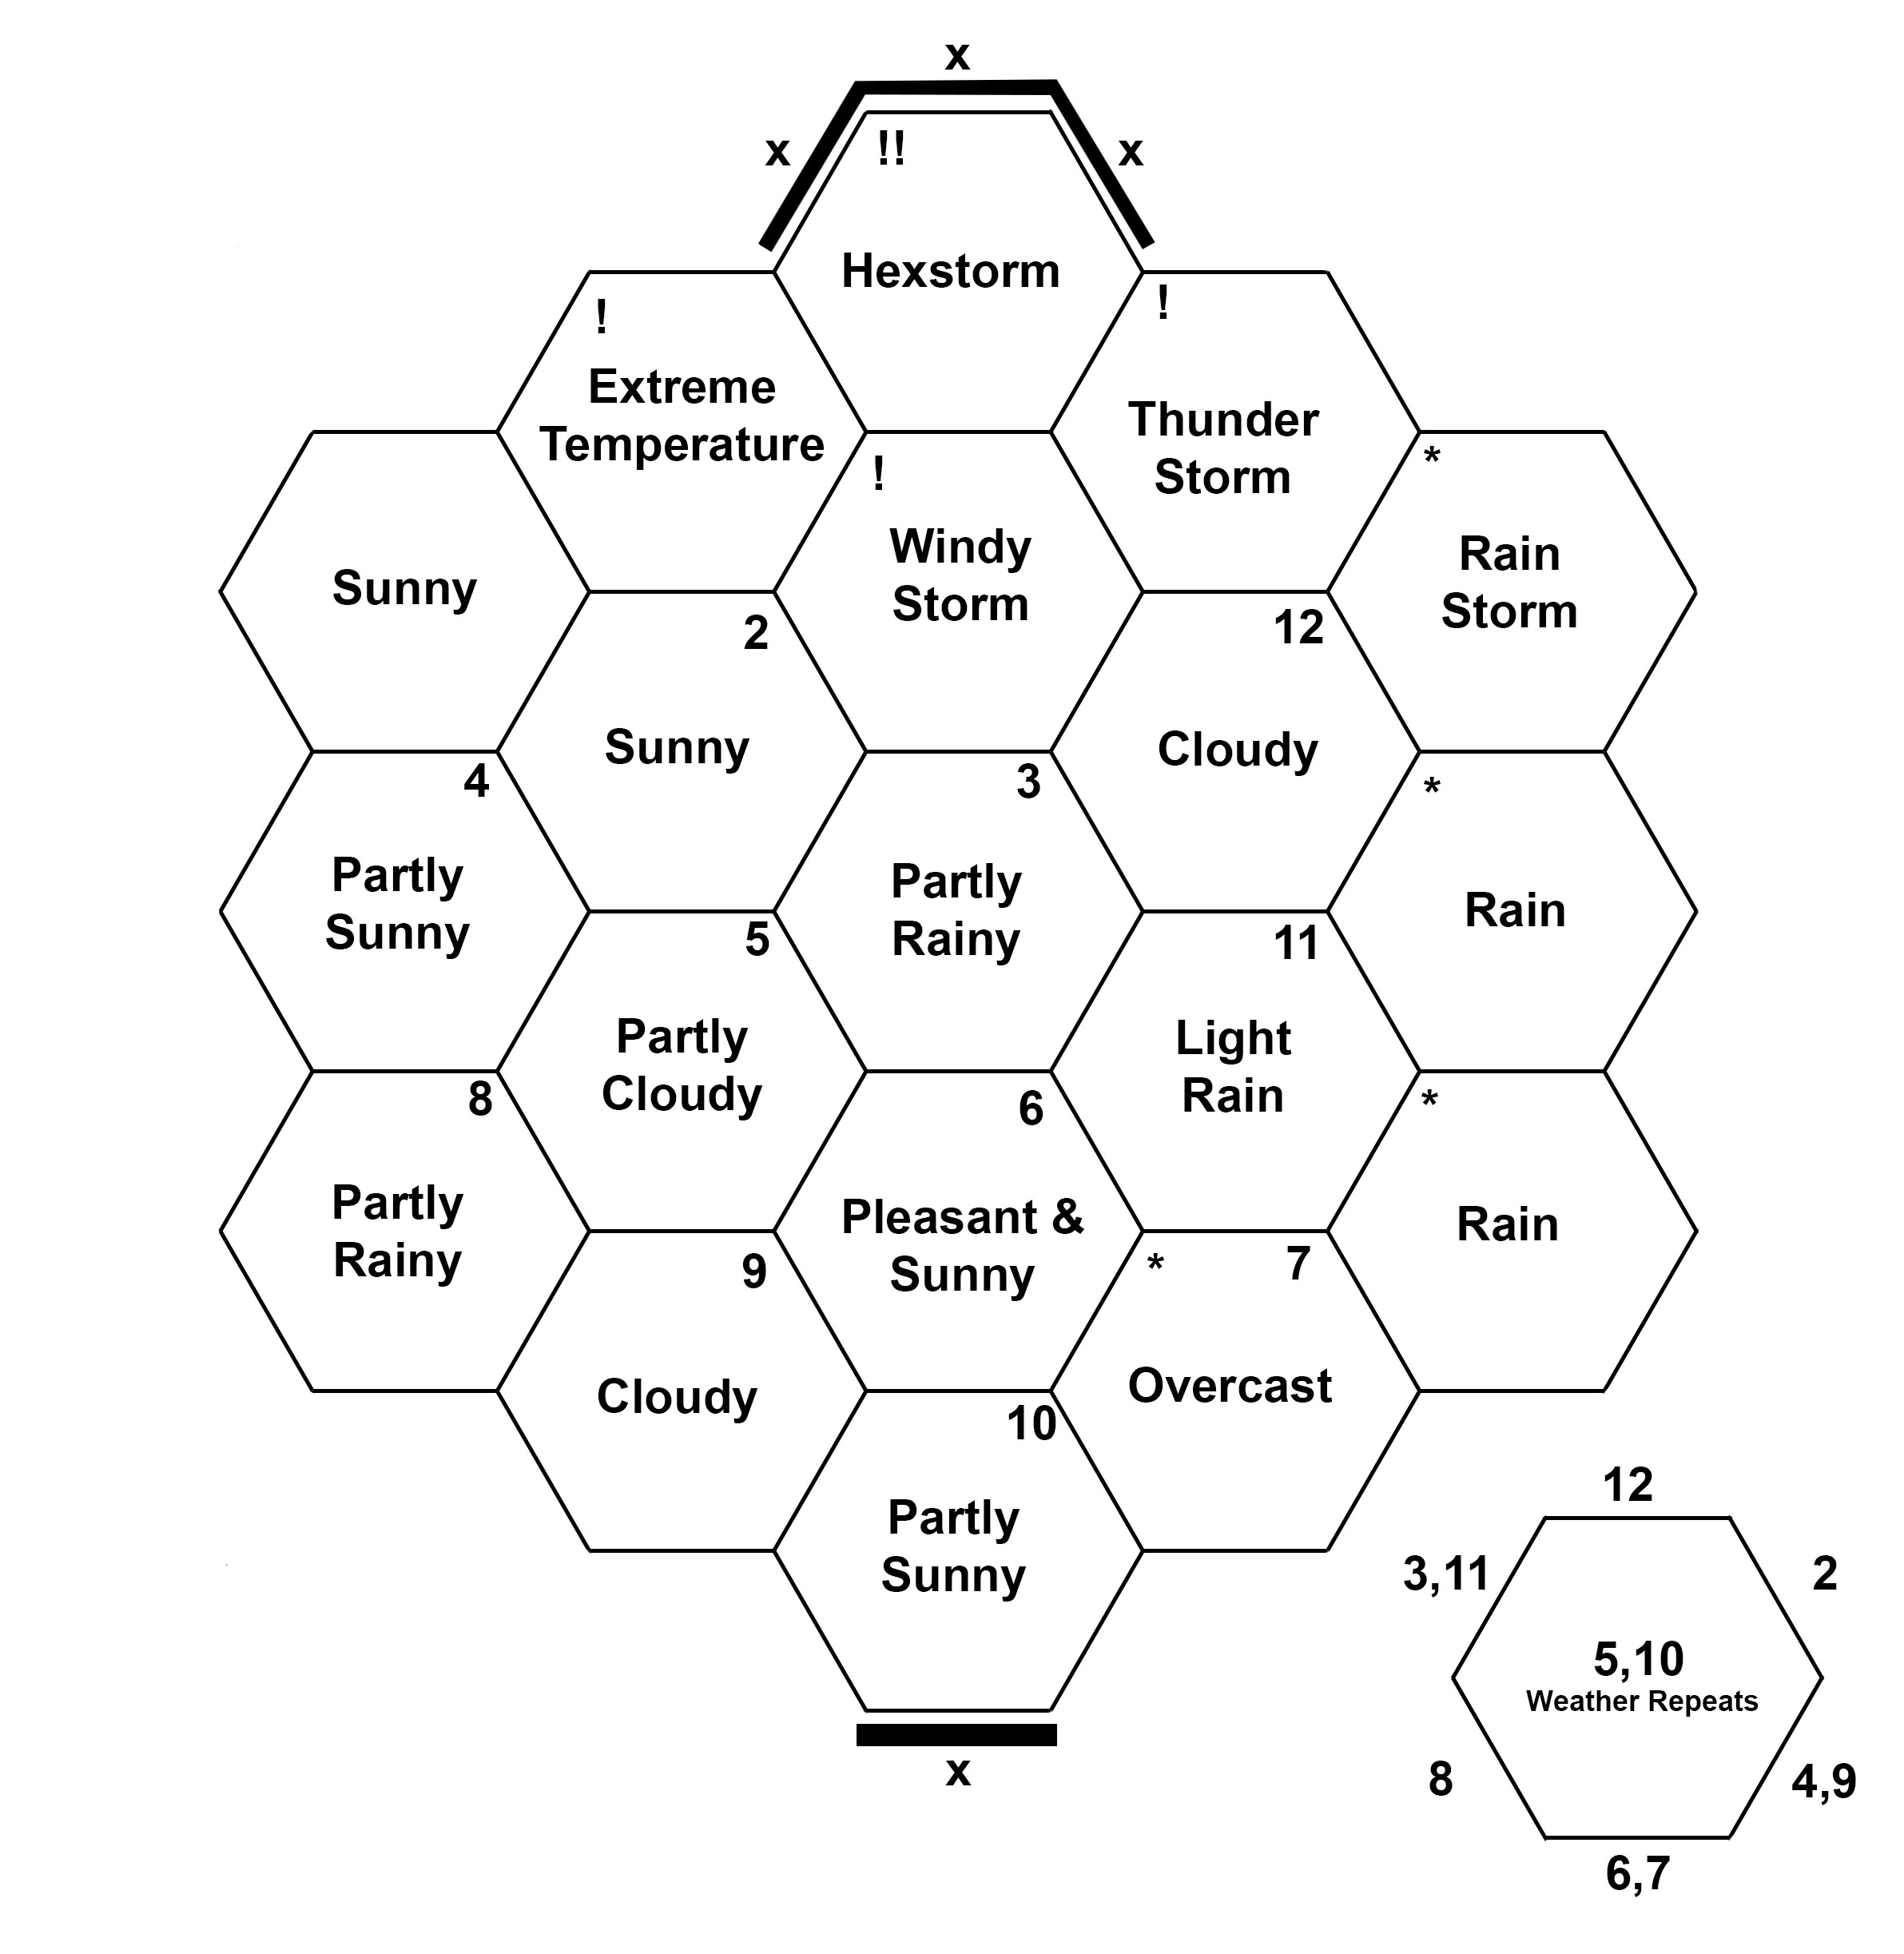
- Roll 2d6 and compare to the Weather Hex.
Per Watch (8 hour period, 3 watches per day)
- *Navigation check to head into the next Hex (if applicable).
- Skill checks for Surveys, Watches, or Crafting.
- Roll Hex Element (for successful Surveys).
- Roll Encounter Chart.
Solo play is much like normal Road West gameplay. You Navigate into a hex that needs further exploration. You use skills to survey the area. If you are successful with a survey skill check, you Roll on chart 01 Hex Elements. Roll on any corresponding charts to find out the exact Hex Element you discovered. Once you have a final element, it is up to you to weave a tale about the element and how your character interacts with it.
HE01 Hex Elements
| Roll 1d100 | Hex Element | Next Chart |
| 1-25 | Nothing | N/A |
| 26-40 | Resource | HE02 |
| 40-60 | Natural Feature | HE03 |
| 61-99 | Site | |
| 100 | Roll Twice |
HE02 Resource
| Roll (d100) | Resources |
| 1-45 | Wood |
| 46-65 | Hunting |
| 65-70 | Alchemical herbs |
| 71-80 | Coal |
| 81-95 | Iron |
| 96-98 | Tritium |
| 99 | Amarnium |
| 100 | Gold |
HE03 Natural Feature
| Roll (d100) | Natural Feature |
| 1-20 | Standard Terrain |
| 21-25 | Cliff |
| 26-35 | River |
| 36-40 | Chasm |
| 41-60 | Creek |
| 61-80 | Difficult Terrain |
| 81-90 | Path |
| 91-100 | Site (HE04) |
HE04 Sites
| Roll (d100) | Site |
| 1-30 | Marker |
| 31-45 | Road |
| 46-50 | Graveyard |
| 51-60 | Ruined Tower |
| 61-75 | Ruined Building |
| 76-85 | Statue |
| 86-95 | Dungeon |
| 96-100 | Ruined Fortress |
Site Inhabitants
| Roll (d100) | Site Inhabitants |
| 1-60 | Empty |
| 61-100 | Regional (EC02) |
Encounters
Once per watch you roll for encounters. Since you are near Elmhearth, encounters can be more rare, but they can still be quite difficult, so be ready!
EC01 Encounter Chart
| Roll (d100) | Near Base | Next Chart |
| 1-70 | No Encounter | N/A |
| 71-98 | Regional Encounter | EC02 |
| 99-00 | Uber Encounter | EC07 |
EC02 Regional Encounter
| Roll (d100) | Goblin Region | Next Chart |
| 1-10 | Animal Chart | EC04 |
| 11-15 | Easy Demon Chart | EC05 |
| 16-20 | Easy Beast Chart | EC06 |
| 21-35 | Goblin Outcasts | EC03 |
| 36-65 | Goblin Scout Party | EC03 |
| 66-95 | Goblin Gatherers | EC03 |
| 96-99 | Goblin Warband | EC03 |
| 100 | Goblin Merchant | EC03 |
EC03 Goblin Clan Chart
| Roll (d100) | Goblin Clan |
| 1-20 | Tinyfoot |
| 21-60 | Red Maw |
| 61-100 | Xlanz Clan |
EC04 Animal Chart
| Roll (d100) | Animal Chart |
| 1-10 | Badger (1) |
| 11-20 | Bat Swarm (1) |
| 21-30 | Black Bear (1d2) |
| 31-42 | Boar (1d3) |
| 43-54 | Deer (2d4) |
| 55-64 | Coyote (2d4) |
| 65-69 | Rattlesnake, Giant (1d2) |
| 70-89 | Spider (1d8) |
| 90-99 | Wolf (1d4) |
| 100 | Dire animal (reroll for type) |
EC05 Easy Demon Chart
| Roll (d100) | Easy Demon Chart |
| 1-15 | Miglin (2d4) |
| 16-25 | Grig (1) |
| 26-35 | Lakava (1) |
| 36-47 | Twig Blight (2d4) |
| 48-59 | Pixie (1d4) |
| 60-67 | Nixie (1d4) |
| 68-77 | Redcap (1d4) |
| 78-87 | Dretch (1d4) |
| 88-93 | Ettercap (1d3) |
| 94-98 | Red Howler (1d3) |
| 99 | Dryad (1) |
| 100 | Phase Cat (1d2) |
EC06 East Beast Chart
| Roll (d100) | Easy Beast Chart |
| 1-20 | Pyrg (2d6) |
| 21-40 | Cockatrice (1d3) |
| 41-55 | Kira (1d4) |
| 56-70 | Vorg (1d4) |
| 71-80 | Earth Wraith (1d2) |
| 81-90 | Night Cat (1) |
| 91-96 | Beelzebuf (1d3) |
| 97-98 | Pseudodragon (1) |
| 99 | Tentacle Crawler (1d3) |
| 100 | Drake |
EC07 Uber Encounter
| Roll (d10) | Uber Encounter (1d10) |
| 1 | Iron Golem |
| 2 | Stone Golem |
| 3 | Hezrou |
| 4 | Wyvere |
| 5 | Night Hag |
| 6 | Succubus |
| 7 | Bulette |
| 8 | Ettin |
| 9 | Babau |
| 10 | Basilisk |
Monster Stats
So most monsters aren’t converted yet. You can see our current collection of converted monsters here. You can also reference the d20 monster stats here, and use stats from the basic d100 monsters here. Getting monsters converted over is on my list of things to do, but it seems that list is quite long.
Rest
One watch must be used for rest. You should have your hero and allies on watch, as being caught unaware at night is never good!
An 8 hour rest replenishes all mana and 2d4 HP per character. If a rest watch is interrupted by an encounter, it is considered only a 4 hour rest, which only replenishes 1/2 mana and 1d4 HP.
Combat
All solo encounters are wandering, meaning while you may find outposts or lairs, there are no large settlements found.
Monster Action Priorities
During the monster’s turn, the monster prioritizes its actions from highest to lowest as follows:
- Make saving throws and remove effects.
- Movement, melee monsters move towards the nearest PC. Ranged and mage monsters move away.
- Defensive spells on self (if needed), followed by offensive spells against enemies.
- Special abilities such as summonings, abilties, and other special attacks.
- Ranged weapon attacks until the enemy enters melee range.
- Melee attacks until the opponent leaves melee range.
When it’s an opponent’s turn, the monster prioritizes:
- Dodge or Parry rolls vs attacks.
- Special abilities.
Monster Rules During Combat
- When it’s the monster’s turn, it targets the PC party member closest to it. If there are two or more targets within the same distance, choose the one that threatens the creature the most (next in line for initiative, or flanking).
- Choose an attack based on the actions available to the monster and which of its actions have the highest priority. If there are two or more actions with the same priority, choose one at random.
- Move the monster towards the target until it’s within the range of the attack.
- Roll the appropriate dice for the attack.
Important Monster Rules
- Monsters always target the closest opponent. If a monster has more than one target, it will prioritize the one that threatens the creature the most (next in line for initiative, or flanking).
- Monsters do not attack invisible or stealthed characters if they’re successfully hidden.
- Monsters stop attacking characters that have been reduced to 0 health points.
- If a monster needs to make a saving throw, break a spell effect, or remove a condition, it will prioritize it first before everything else.
- Monsters will always try to establish a line of sight when making a ranged attack against an opponent.
- Monsters with ranged attacks move until an opponent is within the range of their attack. If the opponent is already within range, discard any movement actions unless the attack requires line of sight.
- Monsters with ranged attacks will attempt to hide behind the closest terrain feature that provides cover after completing their actions.
- Monsters always seek to avoid visible traps and dangerous terrain. They will move around such threats during combat.
Treasure
The simplest way to figure out treasure is to take a gold piece “pay out” for each creature defeated. The table below shows what treasure each CV wandering monster has.
| Rating | Creature CV | Wandering Treasure Value |
| Very Easy | 1/8 | 5 sp |
| Very Easy | 1/4 | 1 gp |
| Easy | 1/2 | 2 gp |
| Easy | 1 | 12 gp |
| Average | 2 | 25 gp |
| Hard | 3 | 40 gp |
Death, the End?
Playing solo can be harsh. When playing solo, we recommend giving yourself a chance to survive if things go sideways. Goblins took out your whole party? Maybe you wake up in a goblin cage and they are getting ready to cook you! A wyvere surprised you in the night? In the morning, you wake up a hex over in a nest with baby wyveres ready to feast. You can also choose to take a Permanent injury and survive. See the SagaBorn d100 Combat chapter for more information.
End of Session
- Roll to try to level up any successfully used skills.
- Write and submit an expedition report on Discord.
- Get paid – the Wanderers Guild pays 100 gp per accepted Expedition Report.
Links
- Interactive Solo Rules: sagaborn.com/solo
- SagaBorn Monster Stats: https://www.sagaborn.com/sbd100/creature-compendium/11-1-sagaborn-bestiary/
- Road West Rules: darkreturn.com/encyclopedia/living-campaign-rules/